Intune/Autopilot Free lab: Part 2 - Autopilot in action
https://sddevblog.blogspot.com/2019/10/intuneautopilot-free-lab-part-2.html
In my previous post, I have explained what Autopilot is and how to configure Intune in order to use Autopilot.
We will now create test it in action in VM and real device and reinstall them using Autopilot.
This is the second post of my "Build your own free lab".
- Part 1 - Intune Configuration - link
- Part 3 - Manage your devices (soon)
Prepare the Hyper-V VM
1. Type the VM name, select the location then click on Next
2. Select Generation 2, then click on Next
3. Choose startup memory then click on Next
4. Choose Connection switch then click on Next
5. Let by default then click on Next
6. Choose your ISO then click on Next
7. Click on Finish
OS Installation
1. Choose your language, then click on Next
2. Click on Install now
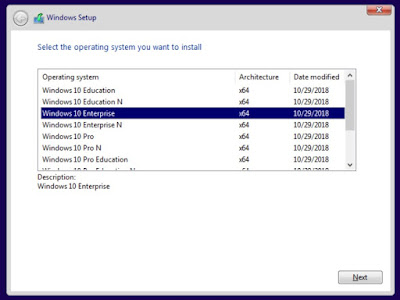
3. Choose OS to install then click on Next
4. Check I accept then click on Next
5. Select Custom
6. Click on Next
7. Install now starts
8. At this step we will export the device configuration.
9. Type Shift+F10 to open the command prompt
Import your first device
Export VM configuration
In this example we will export the device configuration after the installation. A this step you should be on the OOBE part with the command prompt opened.
1. Type Powershell
2. Type the below script in the command prompt
3. See below the overview
2. Stop the VM then mount the VHD to get the CSV as below:
3. Copy the CSV on your local computer
Import your VM
Now let’s add our VM it in our environment.
1. Go to Intune
2. Go to Device enrollment
3. Go to Windows Enrollment
4. Go to Devices
5. Click on Import
6. Click on the Browse button
7. Browse to the CSV file then click on Import
8. A notification is displayed when the process starts
10. Click on Sync, to see the imported device
11. Your device will now appear on the list
Assign user to devices
1. Check your device
2. Click on Assign user
3. Select the user previously created, this one with Global administrator rights.
4. Click on Select then Save
5. A notification will be displayed
Check group members
Now we will check if the group previously created contains our new devices.
1. Go to Azure Active Directory
2. Go to Groups
3. Click on the Group
4. Click on Members
5. The group correctly contains our VM
If you have a device that has already been installed, continue to the next step Reset your devices.
If you are on the first OOBE part you can go to the Autopilot in action part.
Reinstall device with Autopilot
Reset your devices
The next part is our test but note that when you receive a new post you don't have to do this.
1. Connect to the VM and the real device and reset them in order to go back the OOBE part.
2. In your computers go to the Settings part
3. Go to Update & Security
4. Click on Recovery
5. In the recovery main page click on Get started
6. Click on Remove everything
7. Click on Just remove my files
8. Click on Reset then wait
Autopilot in action
This is the step when Autopilot starts, after the OOBE step.
When you manage Autopilot directly with the vendor, you won't have (of course) to do all steps before, this is just for our test. Indeed when the vendor will send computer to the customer, it will come to this state.
At this step we have install our VM, then export configuration to CSV.
1. Select your region then click on Yes
2. Select your keyboard layout, then click on Yes.
3. Click on Skip
4. Now Autopilot and Intune process start. Type your password. Once you will type your mail the autopilot process will configure your device and account with Intune policies and parameters that are applied to your device.
5. Your computer is being configured.
Note: This screen corresponds to the Enrollment status page. We will see that in the next post. To understand this page see this nice post from Michael Niehaus.
See below a short overview of steps in this page (from the above link):
- Device preparation. This covers a fixed set of tasks related to joining AD or AAD, enrolling in Intune, and figuring out what needs to be tracked before the ESP can say the device has been successfully provisioned.
- Device setup. All device-targeted policies (and sometimes some user-targeted ones too) are delivered during this phase, and some of them are tracked.
- Account setup. All user-targeted policies are delivered during this phase, and some of them are tracked.
6. Now you can logged-on on your company profile
Check enrollment
1. Once you have been logged in the user session, go to Settings
2. Go to the Accounts part
3. Go to Access work or school
4. You should see Connected to Azure AD
5. On the Azure portal, go to Azure AD, then Devices. You will see your device
In the next post, we will see how to manage our devices using Intune, like deploy software, configure policies...


